Installation of pxe boot, Linux and Windows
updated 12 May 2015PXE booting lets a machine pull a boot image over the network and install an OS without a USB drive or DVD. This guide covers setting up a PXE server on Debian that can boot Debian, Ubuntu, and Windows 7.
Intro
I wanted a faster way to install new machines with whatever OS I felt like using. Debian, Ubuntu, Windows — it should all come from one place. After some searching, the setup turned out to be less involved than expected.
DHCP Setup
I run dnsmasq for DNS and DHCP on my network, so one line in the config points clients to the PXE server:
dhcp-boot=pxelinux.0,kirk,192.168.20.12This line is needed because my DHCP and PXE servers run on separate nodes. If they ran on the same node, the static interface configuration would instead contain:
filename "pxelinux.0"; next-server 192.168.1.50;When a machine boots from the network, it looks for a TFTP server at the address the DHCP response provides, then fetches pxelinux.0 from that server. pxelinux.0 reads its configuration from pxelinux.cfg/default. That file is shown later in this guide.
Installation of the pxe server
Install the two required packages:
apt-get install tftpd-hpa syslinuxtftpd-hpaprovides the TFTP serversyslinuxprovides the kernel and menu tooling
The default TFTP root is /srv/tftp. I changed mine to /var/lib/tftpboot, which is the common convention for PXE servers:
mkdir -p /var/lib/tftpbootThe -p flag creates the full path, not just the final directory.
Configure the TFTP daemon by editing /etc/default/tftpd-hpa:
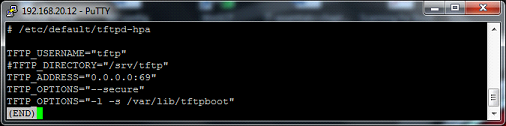
Note that TFTP_DIRECTORY is commented out. If you set a symbolic link pointing to /var/lib/tftpboot, tftpd-hpa detects multiple directories and fails to restart, logging “Too many Directories” in syslog. Commenting it out avoids that.
Copy the PXE bootstrap binary from Syslinux into the TFTP root:
cp /var/lib/syslinux/pxelinux.0 /var/lib/tftpboot/Restart the service and check syslog for errors:
service tftpd-hpa restartTFTP uses UDP, so netstat -ant will not show a listening port. The TFTP_ADDRESS="0.0.0.0:69" line in the config confirms it listens on the standard port for all interfaces.
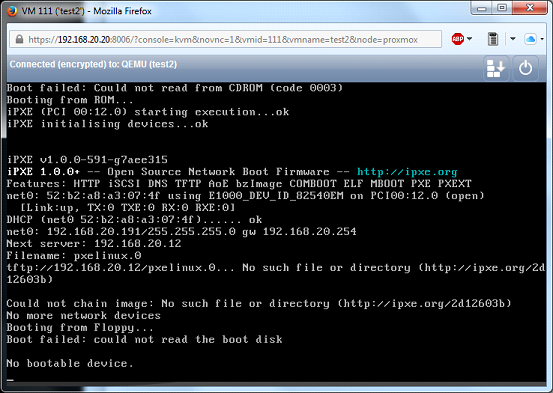
Boot a test machine from the network. It tries the hard drive and CD-ROM first, fails, then starts the PXE process: gets an IP, prints network settings, receives the next-server address, and fetches pxelinux.0. That binary looks for pxelinux.cfg/default. Without a display text file configured, it shows nothing but BOOT:
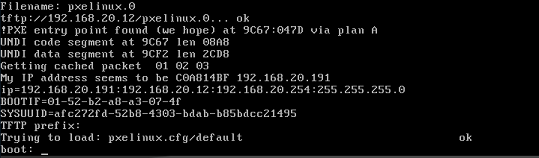
Creating Boot menu
A boot.txt file provides plain-text display for a basic menu. A minimal example:
- Boot Menu -
=============
Linux
1) Debian Wheezy 64bit
2) Debian Wheezy 32bit
3) Ubuntu 64bit

Windows
4) Windows 7

System will boot from Harddrive.......
In practice that looks like this:
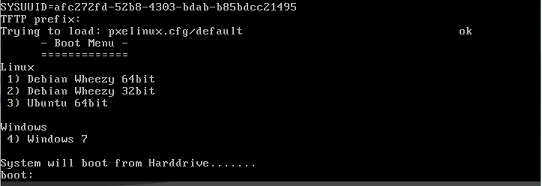
For a graphical menu, Syslinux provides menu.c32. Copy it from the Syslinux directory to the TFTP root:
cp /usr/lib/syslinux/menu.c32 /var/lib/tftpbootThe file must sit in the same directory as pxelinux.0. Then update /var/lib/tftpboot/pxelinux.cfg/default to use it:
UI menu.c32
DISPLAY boot.txt
DEFAULT HDD
PROMPT 1
TIMEOUT 50

LABEL 1
  menu label ^1) Install Debian 64bit
  kernel debian/wheezy/amd64/linux
  append vga=normal initrd=debian/wheezy/amd64/initrd.gz --

LABEL 2
  menu label ^2) Install Debian 32bit
  kernel debian/wheezy/i386/linux
  append vga=normal initrd=../debian/wheezy/i386/initrd.gz --

LABEL 3
  menu label ^3) Install Ubuntu 64bit
  kernel /ubuntu/amd64/linux
  append vga=normal initrd=ubuntu/amd64/initrd.gz --

label 4
  menu label ^4) Install Windows 7 x32/x64
  KERNEL memdisk
  INITRD windows/winpe_x86.iso
  APPEND iso raw

LABEL 5
  MENU LABEL ^Q) Continue Bootup
  kernel chain.c32
  append hd0
What these directives mean:
UIsets the user interface file.menu.c32draws the graphical menu.DISPLAYshows a text file before the menu. Withmenu.c32active it is redundant and can be removed.TIMEOUTis the delay in tenths of a second.50means 5 seconds.LABELis what the bootloader matches against keyboard input. Typing3and pressing Enter executes theLABEL 3block.menu label ^3) Install Ubuntu 64bit— the caret marks the hotkey. The menu shows3) Install Ubuntu 64bit.
kernel /ubuntu/amd64/linux— the kernel file downloaded from the Ubuntu FTP server.append vga=normal initrd=ubuntu/amd64/initrd.gz --— the bootloader for that OS.
For Windows, the LABEL 4 block uses memdisk to load a WinPE ISO as if a CD were present:
label 4
  menu label ^4) Install Windows 7 x32/x64
  KERNEL memdisk
  INITRD windows/winpe_x86.iso
  APPEND iso raw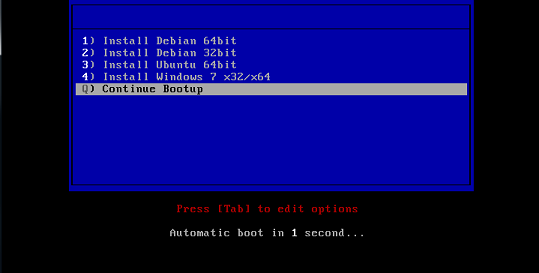
Preparing the boot images
The menu exists but the kernel files do not yet. Linux distributions ship netboot images that download the rest of the OS during installation, which requires an internet connection. For multi-machine installs, a local proxy or mirror is worth setting up.
From the TFTP root, download the Debian Wheezy 64-bit netboot files:
mkdir -p debian/wheezy/amd64
cd debian/wheezy/amd64

wget ftp://ftp.dk.debian.org/debian/dists/wheezy/main/installer-amd64/current/images/netboot/debian-installer/amd64/linux

wget ftp://ftp.dk.debian.org/debian/dists/wheezy/main/installer-amd64/current/images/netboot/debian-installer/amd64/initrd.gz
For 32-bit:
mkdir -p debian/wheezy/i386
cd debian/wheezy/i386

wget ftp://ftp.dk.debian.org/debian/dists/wheezy/main/installer-i386/current/images/netboot/debian-installer/i386/linux

wget ftp://ftp.dk.debian.org/debian/dists/wheezy/main/installer-i386/current/images/netboot/debian-installer/i386/initrd.gz
For Ubuntu 64-bit:
mkdir -p ubuntu/vivid/amd64
cd ubuntu/vivid/amd64

wget http://ftp.ubuntu.com/ubuntu/dists/vivid/main/installer-amd64/current/images/netboot/ubuntu-installer/amd64/linux

wget http://ftp.ubuntu.com/ubuntu/dists/vivid/main/installer-amd64/current/images/netboot/ubuntu-installer/amd64/initrd.gz
Windows Boot WinPE
Windows needs a WinPE image built on a Windows machine. Download and install the Microsoft Windows AIK on a Windows 7 machine. After installation, open “Deployment Tools Command Prompt” from the Start menu and run:
copype x86 C:\winPE_x86
copy "C:\Program Files\Windows AIK\Tools\PETools\x86\winpe.wim" C:\winpe_x86\ISO\Sources\Boot.wim
copy "C:\Program Files\Windows AIK\Tools\x86\Imagex.exe" C:\winpe_x86\ISO\
oscdimg -n -bC:\winpe_x86\etfsboot.com C:\winpe_x86\ISO C:\winpe_x86\winpe_x86.iso
This produces winpe_x86.iso. On the PXE server, create the target directory:
mkdir -p /var/lib/tftpboot/windows/windows7Copy winpe_x86.iso to that directory via SCP or the Samba share described below.
Set up Samba to hold the Windows DVD installation sources. Install the packages:
apt-get install samba samba-common samba-winbindBack up the default config and create a new one:
mv /etc/samba/smb.conf /etc/samba/smb.conf.backup
nano /etc/samba/smb.conf
Add this configuration:
[global]
  workgroup = PXE
  server string = Samba Server Version %v
  log file = /var/log/samba/log.%m
  max log size = 50
  idmap config * : backend = tdb
  cups options = raw
  netbios name = pxe
  map to guest = bad user
  dns proxy = no
  public = yes
  # For multiple simultaneous installations - disable file locking
  kernel oplocks = no
  nt acl support = no
  security = user
  guest account = nobody

[install]
  comment = Windows 7 Image
  path = /share/windows
  read only = no
  browseable = yes
  public = yes
  printable = no
  guest ok = yes
  oplocks = no
  level2 oplocks = no
  locking = no
Validate the config:
testparmCreate the share directory and set permissions for guest access:
mkdir -p /share/windows
chmod -R 0755 /share/windows
chown -R nobody:nogroup /share/windows
Copy the Windows installation files into /share/windows.
Boot a test machine and select the Windows option from the PXE menu:
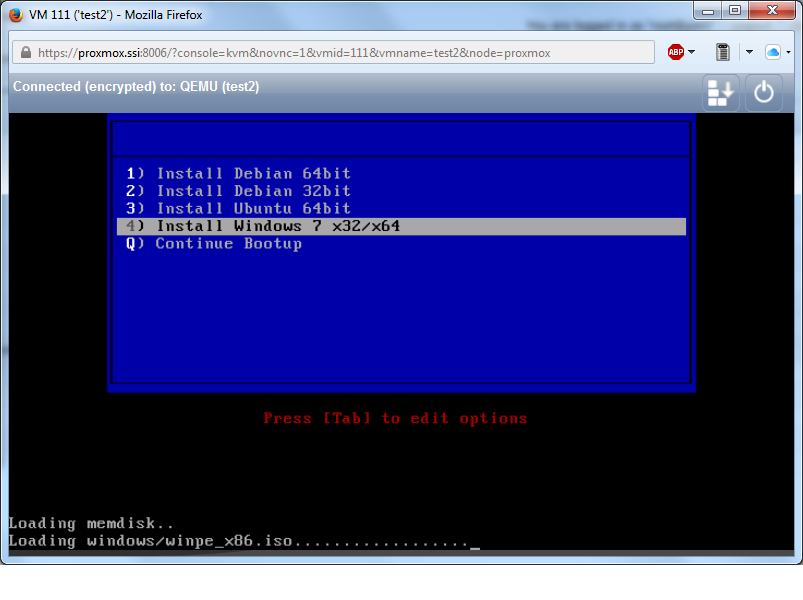
The ISO loads and behaves like a physical CD. After the Windows files load, a command prompt appears:
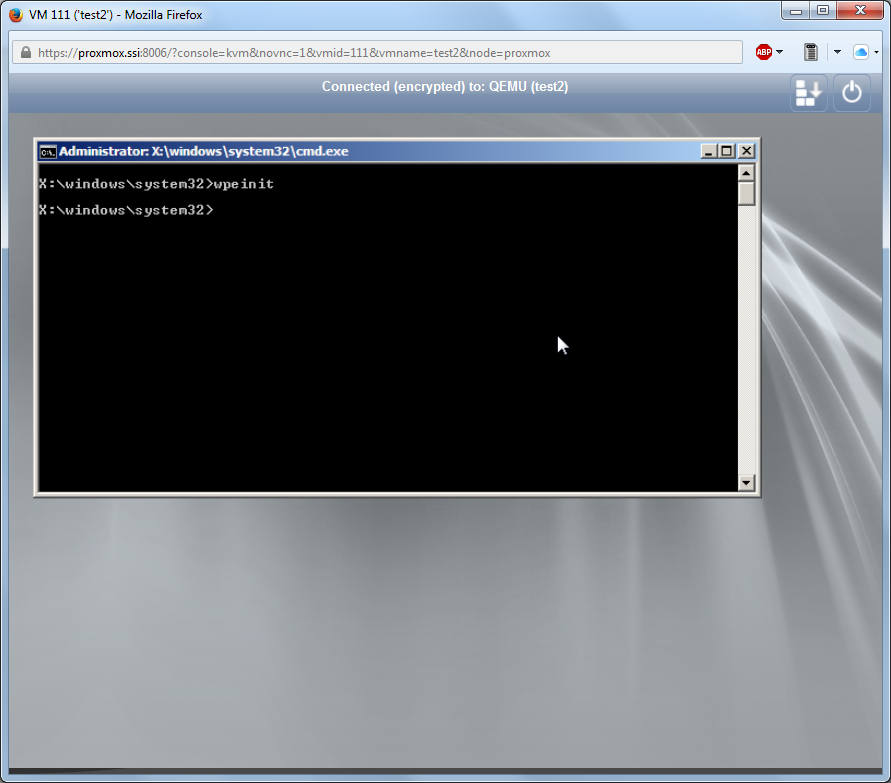
Map the Samba share and run setup:
net use u: \\<Samba_share_IP>\install\x64
u:
Setup.exe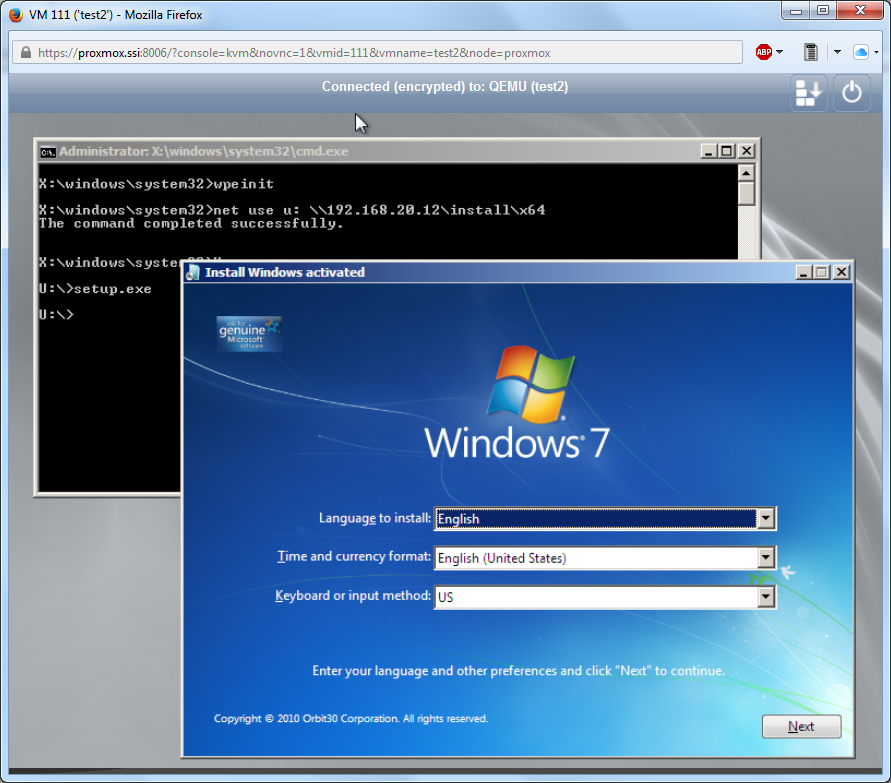
From here the Windows installer runs the same as a CD-based installation. The next step for this setup is an unattended.xml file for automated multi-machine deployments.